Search This Blog

Monday, September 30, 2013

Steampunk work station

While I do have a craftroom...I don't seem to actually like sitting in there and working on my stuff. It's more of a room to store my craft supplies and projects, etc.  I find I actually like to work in my livingroom or on the floor in the diningroom while the tv is playing.  With that all said, I still have my 4 folding tables set up against the diningroom wall left over from my birthday party back on the 21st.  So, I'm utilizing the extra table-top space as my Steampunk workstation:


Up-close:


And, some quick fun shots of my goggles (nearly finished) on a mannequin head:


And that's all for now.:D


Steampunk: Brooch/Choker WIP -part 2

Doing a little bit of combining here...

First up, working on a decorative piece to put on my hat with the feathers....this is what I've got so far:

-It's going to have some aged pen nubs and clock hands coming out from the backside of it, and when I'm ready for it, the feathers under all that.    
I've already started painting on the clock hands and pen nubs. I'm going to had a green/blue patina to the larger two clock hands for some contrast.


And the choker-necklace. I've removed the gems and glued down the other set of gears. Here's how it now looks:


I'm much happier with this now than with the gems.  Hopefully this will wear quite nicely. I think it will. :)


Steampunk: Top Hat WIP -part 4

Just got the corset part onto the hat. I think it looks good, especially for this being my first time EVER doing anything like this. There are things I would certainly do differently next time, but at this point, I've already done enough work to that bit of fabric...I'm going to run with what I've got right now.


I've, of course, still got more work to do to this...but here's with the corset part glued to the hat now:


I originally had intended for the corset's front to be the front of the hat...but I'm now actually not sure... I'm thinking of 'possibly' turning the corseted part to the side instead....

Thoughts?


Steampunk: Makeup 'looks'

As I've mentioned in past posts, I'm attending a Steampunk themed costume party Oct. 5th...with that I'm not only working on props and costume pieces, but also planning my makeup and hair for this event...

So, here's a look I tried out lastnight, inspired by a look or two I saw on Pinterest:


This look was accomplished with MAC's "Blackground" paint pot as the base, MAC's "Carbon" eyeshadow brushed over the base, and "Crucible Gold" mineral shadow by TKBTrading.com patted over top.  CoverGirl's "Vanilla" eyeshadow on the brow bone.


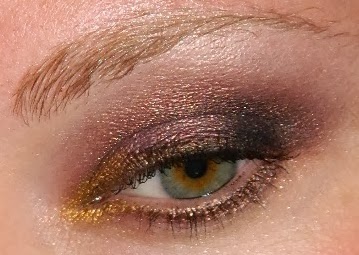
I've been aiming more for browns/coppers/bronze shades and even silvers...but I was leaning more toward a wine shade this night:

Revlon's "Crushed Wine" eyeshadow over MAC's "Artifact" paint pot, Fyrinnae's "Pumpkin Fire" loose shadow on the outer corner and TKBTrading's "Crucible Gold" min. shadow on the inner corner.  Bobbi Brown's "Chocolate" cream liner at the lash line with MAC's "Blackline" Pearlglide eyeliner. 


Maybelline's 'Color Tattoo' cream shadow in "Bad to the Bronze" used as the base, MAC's "Copperbeam" pigment shadow over top, with MAC's "Carbon" eyeshadow in the outer corner. Bobbie Brown's "Chocolate" gel liner at lash line.


I like the combo of pewter and brown with this one...
Maybelline's 'Color Tattoo' cream shadow in "Audacious Asphalt" as the base on the lid, a gunmetal silver shade from Sleek Cosmetic's "Graphite" palette, Urban Decay's "Revolver" 24/7 liquid liner at the lash line, a matte "Brown Smolder" shadow by CoverGirl in the crease up to the brow bone.


MAC's "Moss Scape" paint pot as the base, TKBTrading's "Verdigris Gold" mineral shadow, TooFaced's "Label Whore" shadow in the crease to brow bone, MAC's "Plumage" shadow in the outer corner, MAC's "Rich Ground" Fluidline gel liner at the line.


Steampunk: Top Hat WIP -part 3

Just a quick little update here... lastnight I finally got the brim totally hand-sewn and now I have the beginnings of a small blister on the tip of my thumb. But I think it was worth it.:)
Still planning on doing a black trim around the edges of the brim.


I sized and cut the fabric for the corset part that will go around the middle of the hat and just finished hand-hemming it. I was going to go with the thinner black bias tape I've got, but I think it looks really good without that.  Once I got all the edges folded over and hand-stitched for a nice, clean edge...then it was time to add the rivet-eyelets:


They didn't come out exactly perfect..but I'm not too concerned about that right now.
I only had the small black eyelets, but had planned to paint them, anyhow.  So after a quick rub-down with some liquid-gold metal paint and then some matte black for aging, here they are:


Much happier with them now.:)

Tonight I'll be adding this corset part to the hat...first using adhesive and then probably doing some hand-stitching.  I've pulled out some peacock and pheasant feathers and am planning on making a new brooch piece with the feathers for the hat.
-I had seen a bleached-white peacock feather at Hobby Lobby that I'm wishing I'd gotten...might still...I think it could look really sharp.:)


Steampunk: Necklace-choker and Brooch WIP -part 1

In my 'research' (i.e.- googling and Pinterest for reference images) I noticed various ladies wearing lovely chokers around their necks...well, I don't actually 'have' anything like that, so I decided to make my own:


Right now I'm nearly done with this, but I'll go ahead and post my Work-In-Progress pics up to this point:

I saw the large, black ruffle lace and went from there. So this choker is made of 3 different lace styles all in black and brown:


-All glued together with Aileen's clear craft glue.

I bought two different pendants, I just couldn't decide...so I went with both. The girl's silhouette is, of course, far more Victorian...and the 2nd pendant with the gem looks more 'art nouveau', but together...they look really nice.


It took me a while to decide on how I wanted to do the enclosure..I thought about possibly hook'n'eye clasps, or an ornate button, even a metal clasp with a chain...but I finally decided upon just an eyelet to lace closed:


-The bias tape on the edges is hand sewn on.

I was looking at my gears and stuff and decided that I wasn't done with the decorative brooch area, so I started playing and came up with this:


I really like this.  But then I thought that maybe I should add in some crystal gems I've got:


The more I'm looking at it though...not sure I'm liking the gems...


I think I'm going to go with no gems, afterall....not liking it so much and I like it better plain.


Steampunk: Flint lock Pistol -Finished.

I think that, for now, I've done all that I can think to, or know to, do on my Steampunk'ed Flint Lock Pistol.


I honestly don't know 'what' this extra piece is or it's function. A friend of mine let me go through his hardware-junk drawer and I found this piece. I rather like it on here.:)

So, consider this piece, for now...FINISHED. :D