
I feel like, finally, the wings are getting closer to completion. They are certainly looking it now. :)

Since my last post I have added two smaller wing-petals to the Steampunk wings, riveted them, painted, etc. I recently had ordered 9ft of green electroluminescent wire off of Amazon.com. I had, naively, assumed that 9ft would be more than enough wire to work with. Ha! Bull...I was SOOO wrong -which I came quickly to realize lastnight as I sat on my livingroom floor with the wire and a hot glue gun. :/
-First, I suck with math...especially measurements. For some reason I've always had a problem accurately estimating measurements in my head. For instance, I often like to remodel rooms in my head...which I've been working on with my craftroom. I've got a table I'd like to build and set into my craftroom, so periodically I'll find myself mentally reconstructing the room and trying to figure out 'where' to set this table and move everything else around to fit cohesively...but also making sure everything will fit and taking in everything's sizes. Without a fail, I 'always' overestimate the amount of room I have to work with. Even though I've been in that room countless times, when it comes to actually reimagining that room in my mind -I give myself more room to work than I actually have.
Well....sadly, same with everything else.
I honestly expected 9ft to be a lot more than it, apparently, is in reality.:( Due to the 9ft being inadequate, I wasn't able to outline the wings themselves as I'd wanted to, instead I ended up outlining the faux-metal panels on the wings. Which still looks really good. I'm now wondering if coming back to them later on and outlining the wings, too, might end up being too much...not sure, yet.
So, to start off...I didn't take more than one WIP pic of the smaller wing panels because they are exactly like the larger ones and I was in a hurry to get these done as I had an event to attend the next day in costume.
First up, the wing frame made of 12g galvanized wire:
 I had wanted the 2nd set of wings to be quite a bit smaller than the first set...but, as I've said in the past: I, apparently, suck at doing 'small'....so, these 'smaller' wings turned out larger than I'd intended, but still small enough to work with. Honestly...the smaller ones are about the size that I'd originally intended the wings to be in the first place. *laughs*


 The inside, shown above, is unfinished at that point...I wore them to my event like this, but I really doubt that 'anyone' noticed...they were so into how the front side looked, anyway.:)
 -This is how I've been hanging the wings in my diningroom space while working on them. That is actually the stand for my 4 folding tables, which are actually set up against the wall in the background there to hold my Steampunk supplies and stuff.
-but in this pic you can better see the paint job on the metal mesh of the wings.
Late in the evening I finally went down to check my mail box and was delighted to find that, amongst a couple of packages of stuff I'd recently ordered, there was my electroluminescent wire -huzzah!:D
 -In the image on Amazon there's nothing set up against this for size comparison...so I had assumed that this wire and the battery pack was, indeed, larger than it actually is. I'm quite thankful that the battery pack is quite smaller...but was surprised at how thin the wire itself is.
 Well, it may be quite thin, but it gives off a hell of a strong glow! :)
I only took one WIP shot of me attaching the wire to the wings as it really wasn't that exciting and I didn't want to keep stopping to take a photo. I just used hot glue to attach it..easy as that:

And here are some finished shots of it:


 -Here I'm showing the finished inside of both sets of wings. I need to get one more package of the nail heads to finish off one of the larger wing panels and then that part is done. I'm quite happy with how much better they look with the nail heads and the decorative flat-backed marbles.


I've got some decorative wood panel pieces which I've already painted and started the aging process on which I'm thinking of adding to these wings. I'm not sure, yet...going to play around with them on the wings and the wing pack before doing anything permanent.
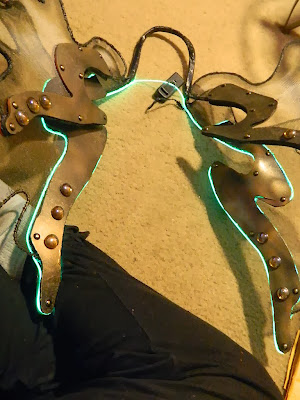 -these are upside down and that's part of my lap.
You can see on the left side, the larger wing, is the unfinished faux-metal panel...that's the one I need more nail heads for.

 Leaning up against my livingroom's coffee table. -

 -And this is how they are right now. Even with the wire turned off, I think they look pretty cool with the wire around them like this.:)

Since my last post I have added two smaller wing-petals to the Steampunk wings, riveted them, painted, etc. I recently had ordered 9ft of green electroluminescent wire off of Amazon.com. I had, naively, assumed that 9ft would be more than enough wire to work with. Ha! Bull...I was SOOO wrong -which I came quickly to realize lastnight as I sat on my livingroom floor with the wire and a hot glue gun. :/
-First, I suck with math...especially measurements. For some reason I've always had a problem accurately estimating measurements in my head. For instance, I often like to remodel rooms in my head...which I've been working on with my craftroom. I've got a table I'd like to build and set into my craftroom, so periodically I'll find myself mentally reconstructing the room and trying to figure out 'where' to set this table and move everything else around to fit cohesively...but also making sure everything will fit and taking in everything's sizes. Without a fail, I 'always' overestimate the amount of room I have to work with. Even though I've been in that room countless times, when it comes to actually reimagining that room in my mind -I give myself more room to work than I actually have.
Well....sadly, same with everything else.
I honestly expected 9ft to be a lot more than it, apparently, is in reality.:( Due to the 9ft being inadequate, I wasn't able to outline the wings themselves as I'd wanted to, instead I ended up outlining the faux-metal panels on the wings. Which still looks really good. I'm now wondering if coming back to them later on and outlining the wings, too, might end up being too much...not sure, yet.
So, to start off...I didn't take more than one WIP pic of the smaller wing panels because they are exactly like the larger ones and I was in a hurry to get these done as I had an event to attend the next day in costume.
First up, the wing frame made of 12g galvanized wire:


 |
| My little boy, Indy, had to be in the pic, I suppose. ;D |


-but in this pic you can better see the paint job on the metal mesh of the wings.
Late in the evening I finally went down to check my mail box and was delighted to find that, amongst a couple of packages of stuff I'd recently ordered, there was my electroluminescent wire -huzzah!:D


I only took one WIP shot of me attaching the wire to the wings as it really wasn't that exciting and I didn't want to keep stopping to take a photo. I just used hot glue to attach it..easy as that:

And here are some finished shots of it:


I think they look really cool with both the electroluminescent wire and the plasma discs turned on together.


*Regarding the wing pack....I haven't done anything more to it since my last post....I wasn't happy with how the newly silver painted/aged cylinder turned out...been debating on going back to the aged brass or trying again with the silver. I like the contrast between the aged silver and brass...but not certain, yet. The wing pack will be a continuing work-in-progress for a while. Unfortunately, it won't be nearly finished before Halloween...but that's ok. It'll be close enough.
-I'm taking the wing pack to a friend's tomorrow evening and he's going to help me get the wings attached to the inside of the pack via some metal clamps and screws. And then I'm going to add some padding and straps. I may take the straps with me and see if I can get his help in making sure I get that done correctly.
So far this month I've had two opportunities to wear the wings out in costume -once as just the 2-wing petal set and then last week with the 4-wing petal set up. Both times I just wedged it down the back of my bodice -same as I do with all of my fairy wings. Well, for some reason, that wasn't working well. The Steampunk wings kept sliding from one side to the other and were continually tilting, which was odd to me as my fairy wings always stand up totally straight and I have very little to no problems with them. Granted, these are quite top-heavy, but I have another fairy wing set that I made this past Aug. which are really big and heavy, too...more so than these.
Before I end this post, a few more pics of the wings all lit up:

You can see on the left side, the larger wing, is the unfinished faux-metal panel...that's the one I need more nail heads for.


 -And this is how they are right now. Even with the wire turned off, I think they look pretty cool with the wire around them like this.:)
*The battery pack currently is just clipped onto the electroluminescent wire at the base of the wings...but if all goes well, it'll be attached to the inside of the wing-pack.
A quick note on the electroluminescent wire: it has a button on the battery pack which has 3 function options...one is a static light (steady, consistent), the 2nd is a slow pulse, the 3rd is a fast pulse.
This wire looks really cool and is light-weight and the battery pack only requires 2 AA batteries. All very awesome and also amazingly inexpensive. $7 -not including the S&H.
Now, the con: when turned on, it emits this low but sharp metallic buzzing noise. I'm hoping that while I'm wearing the wings out and about, the sound won't be noticeable; but in my apt, even with the tv on, it's pretty noticeable.
Otherwise, a pretty great product. I have some ideas for more uses with this stuff and wings in the future.:)
Thoughts?
Thanks!:D
No comments:
Post a Comment