
Monday, July 1, 2013
What I'm currently up to...
Skulls..
 and...
 It's been put on the back-burner for a little while as I have various ideas in mind that seem to be jostling for the front of the line.
Some reference images:
It's been put on the back-burner for a little while as I have various ideas in mind that seem to be jostling for the front of the line.
Some reference images:
 *
*
*
*
*
*
 *
*
*
*
*
*

Steampunk meets Art-Nouveau meets Faery
 -still debating over the color...I'm pretty partial to purples anyway; I had originally thought maybe a rusty brown or sepia toned off-white, but I feel like so many of the details would get lost against either of those colors either by blending in or being swallowed altogether.
Purple seems to be the right balance right now for everything involved. And it's not a bright or particularly vivid purple, either.
Here I finally found some copper wire that just might work for the wing frame and membrane:
-still debating over the color...I'm pretty partial to purples anyway; I had originally thought maybe a rusty brown or sepia toned off-white, but I feel like so many of the details would get lost against either of those colors either by blending in or being swallowed altogether.
Purple seems to be the right balance right now for everything involved. And it's not a bright or particularly vivid purple, either.
Here I finally found some copper wire that just might work for the wing frame and membrane:
 -and those are iridescent green/blue beetle wings which will also go on the mask..
-This is combo of some of the Steampunk gear and clock elements I plan to use, as well as various bronze jewelry bits that will play in with the art-nouveau theme.
-and those are iridescent green/blue beetle wings which will also go on the mask..
-This is combo of some of the Steampunk gear and clock elements I plan to use, as well as various bronze jewelry bits that will play in with the art-nouveau theme.

 -Also, I plan on adding color accents to the various art-nouveau pieces using these metal Patina paints. I've never used them before, but I think they'll add some excellent color accents here and there.
 ~*~
~*~
 ~*~
~*~
 -I plan to cut this in half and use it as the accent on the forehead...debating over the keep the pearl in the center or not...
*Ironically, the design I drew on the forehead was something I'd come up with before I ever came across this jewelry piece. It's not an 'exact' match to my design, but it comes pretty close.
And all this just for one mask:
-I plan to cut this in half and use it as the accent on the forehead...debating over the keep the pearl in the center or not...
*Ironically, the design I drew on the forehead was something I'd come up with before I ever came across this jewelry piece. It's not an 'exact' match to my design, but it comes pretty close.
And all this just for one mask:
 I've got the silk floral accents in my craft room along with the metal mesh I want to use for the wings themselves.
And, as I want this one to actually turn out smooth and last a long time while keeping it's shape, I'm wanting to give this new clay a try:
I've got the silk floral accents in my craft room along with the metal mesh I want to use for the wings themselves.
And, as I want this one to actually turn out smooth and last a long time while keeping it's shape, I'm wanting to give this new clay a try:
 -I understand that this is primarily used for doll making, but I'm hoping it'll work just as well for a mask.
Thoughts?
-I understand that this is primarily used for doll making, but I'm hoping it'll work just as well for a mask.
Thoughts?
June 2013 Peacock Mask -Finished
 ~*~
~*~
 ~*~
~*~
 ~*~
~*~
 ~*~
~*~
 ~*~
~*~
 I'm pretty happy with how well this one turned out. Unfortunately, the paint job photographed lighter than it really is in person, but otherwise...really good.:)
 June 2013 Commissioned Peacock Mask


Craft Porcelain air-dry clay by Amaco Review
 Now, I don't get a smooth finish as it dries and it doesn't adhere to itself the same way it use to.
Here you can see how rough it looks once dried...the 2nd mask, to the right, didn't dry well at all..some of the edges are turned up rather than drying flat to the base beneath it. And the edges aren't the least bit smooth where I tried to blend the clay together:
Now, I don't get a smooth finish as it dries and it doesn't adhere to itself the same way it use to.
Here you can see how rough it looks once dried...the 2nd mask, to the right, didn't dry well at all..some of the edges are turned up rather than drying flat to the base beneath it. And the edges aren't the least bit smooth where I tried to blend the clay together:
 Further, and unfortunately, this has be a draw-back of this clay since I first started using it, but as I keep so few of my own masks...it's not something I'd be able to notice.
-I have a Fairy mask I made back in 2008 that I have held onto and I've noticed that despite the fact that I made it about 5yrs ago now...the mask still wants to shrink inward at the edges. Unfortunately, even years later, this clay doesn't hold it's shape.
Not a big deal if you are making some like a doll, perhaps...but when it's something you'll be wearing, it's a huge deal.
It's still a decent product, but it's no longer worth the cost or the hassle for me, unfortunately.
I think I've bought my last tub of this product.
I have seen some recipes online for making your own air-dry clay:
http://thejunkwave.com/2011/07/18/how-to-make-your-own-air-dried-porcelain-with-common-household-ingredients/
http://www.craftstylish.com/item/2802/how-to-make-cold-porcelain/page/all
I will be trying one or two of these out myself before too much longer in the hopes that maybe these will work better than the store-bought air-dry clay.
-and at that point, I will post back with my results.
Further, and unfortunately, this has be a draw-back of this clay since I first started using it, but as I keep so few of my own masks...it's not something I'd be able to notice.
-I have a Fairy mask I made back in 2008 that I have held onto and I've noticed that despite the fact that I made it about 5yrs ago now...the mask still wants to shrink inward at the edges. Unfortunately, even years later, this clay doesn't hold it's shape.
Not a big deal if you are making some like a doll, perhaps...but when it's something you'll be wearing, it's a huge deal.
It's still a decent product, but it's no longer worth the cost or the hassle for me, unfortunately.
I think I've bought my last tub of this product.
I have seen some recipes online for making your own air-dry clay:
http://thejunkwave.com/2011/07/18/how-to-make-your-own-air-dried-porcelain-with-common-household-ingredients/
http://www.craftstylish.com/item/2802/how-to-make-cold-porcelain/page/all
I will be trying one or two of these out myself before too much longer in the hopes that maybe these will work better than the store-bought air-dry clay.
-and at that point, I will post back with my results.
"Sculpt it!" air-dry clay review
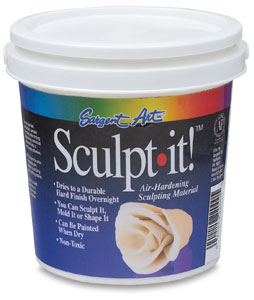 I looked up reviews on how it's used to be sure that I would be using it correctly and for all intents and purposes, looked to be the same as what I'd already been using: Craft Porcelain air-dry clay.
Well, here's what happened:
I looked up reviews on how it's used to be sure that I would be using it correctly and for all intents and purposes, looked to be the same as what I'd already been using: Craft Porcelain air-dry clay.
Well, here's what happened:
 -Here it isn't even all the way dry and has already started to shrink so horribly while drying that it's cracking and separating...and as it's drying, it looks incredibly brittle. And once fully dry, did indeed prove to be very brittle and easily snapped in half.
I returned this crap immediately.
-Apparently some people can get it to work for what they do, but a lot of us can't.
I really wouldn't suggest this product for anything.
-Here it isn't even all the way dry and has already started to shrink so horribly while drying that it's cracking and separating...and as it's drying, it looks incredibly brittle. And once fully dry, did indeed prove to be very brittle and easily snapped in half.
I returned this crap immediately.
-Apparently some people can get it to work for what they do, but a lot of us can't.
I really wouldn't suggest this product for anything.
Subscribe to:
Comments (Atom)